

This is a step by step guide to set up your Yamaha DTXplorer with Propellerhead Software’s Reason. This article was originally was written using Version 6.5 although this method is also known to work with Version 7.1:
Here’s what you will need before proceeding further:
- A desktop or laptop with mouse and speakers
- A working internet connection (for downloading)
- A set of headphones (for practice)
- Reason 4.0 or higher (5.0, 6.0 or 6.5, 7.0, 7.1 or 8.0) FULL VERSION
- An account set up with Propellerhead Software
- A Yamaha DTXplorer
- A midi/audio USB interface (such as a Focusrite Saffire USB 6 or a Yamaha UX-16)
- Midi cables
- USB cables
1) Set up your new Yamaha DTXplorer
Firstly, here’s a link to the Yamaha DTXplorer instruction manuals:
![]() I am going to assume for the purposes of this article that you can get it out of the box, connect it all up, attach a set of headphones and switch it on.
I am going to assume for the purposes of this article that you can get it out of the box, connect it all up, attach a set of headphones and switch it on.
If not, grab the Basic Set Assembly Manual from the link above. For further detailed info – download the Owner’s Manual which is very comprehensive.
It will pay dividends to play around with it a little bit, try out different kit sounds, play along with the songs, set the metronome, and so on.
The manual will help you out with this. There are also quite a few reviews of the DTXplorer on YouTube.
Here’s my video of what the 32 factory kits actually sound like:
If you need any additional help with this, please let me know.
When you have familiarised yourself with how the kit works, move onto step two.
2) Connect your DTXplorer to your computer
EITHER:
a) If you have a Saffire:
The easiest way to do this is to use a humble midi cable. Connect it from the DTXplorer’s MIDI OUT to the MIDI IN on your Focusrite Saffire. The Saffire will need to be connected to your computer via its own USB cable.
Here’s a link to the latest Saffire drivers and manual:
http://global.focusrite.com/downloads?product=Saffire
Once you have downloaded the file, you may have to unzip the installation/setup file and follow the instructions. Plug in the unit once the software is installed.
OR:
b) If you have a UX-16:
Alternatively, You can connect using a Yamaha UX-16 USB Interface cable, from the DTXplorer’s MIDI OUT, directly to a USB port on your computer. You will probably need to download new drivers for the UX-16 from Yamaha’s website. Again, I will assume for the purposes of this article that you can handle this. Make sure you know which version of Windows you are using, either 32 bit or 64 bit, and download the correct drivers for your system. Once you have downloaded the file, you may have to unzip the installation/setup file and follow the instructions. Plug in the unit once the software is installed.
Here’s a link to the latest UX-16 drivers:
http://usa.yamaha.com/products/musical-instruments/keyboards/accessories/usb-midi/ux16/?mode=model
3) Set up the audio drivers and midi devices for Reason on your PC
Again, there will be some preliminary set up to do on your computer to configure Reason to work correctly, before you can get the DTXplorer working with it.
a) Firstly, set your audio drivers in the preferences section.
Go to “Edit”, “Preferences”, and pick the “Audio” tab. Go to “Audio Card Driver” and select the correct driver from the drop down menu. ASIO is best. You may want to download and try ASIO4ALL rather than use the default windows drivers (DX Primary Sound Driver) which are slower (they may introduce “latency” and crackle a bit when under duress).
I use the focusrite ASIO drivers which came with the Saffire which I find better than ASIO4ALL, but ASIO4ALL will still be better than the default windows drivers. The Saffire ASIO drivers will not work unless you have the Saffire physically connected to your system with a USB cable.
b) Secondly, set your midi devices up – these are also called “control surfaces” in Reason.
Go to “Edit”, “Preferences”, and pick the “Control Surfaces” tab.
Click “Add”. Under Manufacturer Select “<Other>”. Change the “Name” to DTXplorer.
Slect the correct “Midi Input” from the drop down menu
If you are running through the Saffire, select “7 – Safffire USB” or similar.
If you are running through the UX-16, select “Yamaha UX-16-1” or similar.
4) Download a reason song EditEd4TV_YamahaDTXplorerToKong_V1.reason from the Propellerhead Forum.
You will need to be a licenced user with Propellerhead to use the following thread*:
https://www.propellerheads.se/forum/showthread.php?p=1107328&posted=1#post1107328
*Note: The original link to the Propellerhead forums is now closed. You can contact the author of this patch via http://www.baumanproductions.com/edited4tv.html
Ed Wrote: “I made a file for you, it converts the incoming DTXplorer MIDI notes into the proper trigger signals for Kong. I only hooked up the primary devices for Kong, as the other ones were somewhat vague and could be different depending on each person’s individual opinions… what goes where, you know? All you have to do is hook up the proper CV cables from the unconnected RPG-8’s to the proper Kong Pad CV Gate Inputs. I went with RPG-8’s as kloeckno mentioned, as the CPU load should be less than using 16 Thor’s. I wanted to use Thor’s because there are much more options that could have been implemented for CV manipulation, but for now let’s do the RPG-8 design and see if this basically works. If anyone has a DTXplorer to try this out, and perhaps make recommendations as to where would be the most logical place to put the other CV cables, please let me know and we’ll move over to version 2. I made this a Reason file so that everyone has access to it.”
Download and open the song file created by Ed Bauman in Reason. Re-Save the song in your current version of Reason if you want and go to the combinator called EditEd4TV_YamahaDTXplorerToKong – save it in a separate folder so you can use it again on its own without opening the song each time.
I use Vista 32-bit so the folder I use is called “Combinators (.cmb)” under a folder called “Reason Refills” on my Desktop.
The full path is C:\Users\<YourUserNameHere>\Desktop\Reason Refills\Combinators (.cmb)
So why did we go to the bother of downloading this song?
This combinator is a clever workaround to compensate for the fact that the Yamaha DTXplorer’s sounds and pads are mapped to (and transmit) different midi notes than the drum devices in Reason such as Kong and Redrum (and the devices in the General Midi specification, for that matter).
The bad news is: We can’t change the notes produced by the DTXplorer by going directly into the DTXplorer’s brain and re-mapping or re-programming them.
The good news is: We can change them after they have left the DTXplorer. We can intercept them and change them into the right notes to be accepted by Reason’s Kong drum machine.
This is what Ed’s combinator does.
You do need to know a little bit about combinators and how to flip them around so you can see how they have been wired up. If you use the tab key, you can flip around the combinator and see what’s going on. Inside this combinator, we have a Kong unit, connected to 16 RPG-8 Arpeggiators. Why?
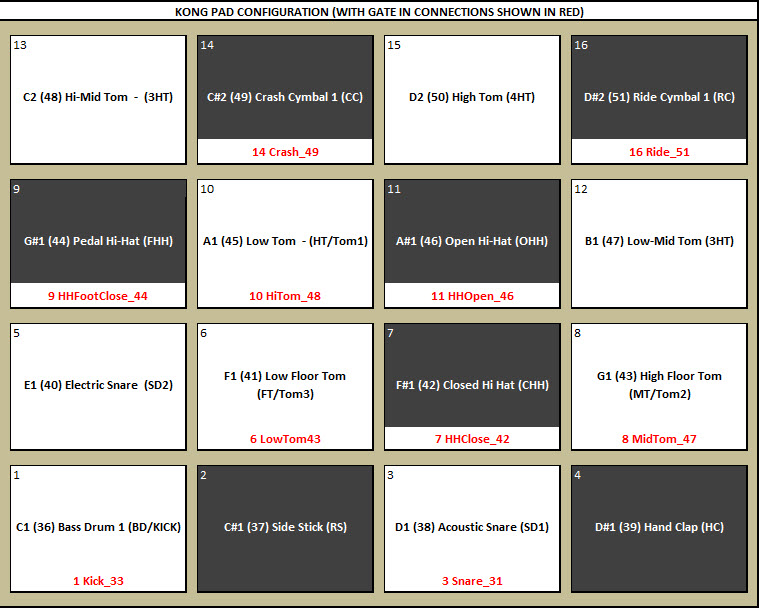
Notice the “Gate CV Out” of each RPG-8 is connected to the “Gate In” on one of Kong’s 16 pads. Each RPG-8 has been set up and named to accept the specific midi note for a specific DTXplorer pad – each one acts as a filter for the different midi notes that are sent from the DTXplorer, so when the right one comes through for a specific pad, (e.g. from the kick drum pad which sends out note 33) it routes it through to the correct pad in Kong using the CV cables and ignores the rest. Job done!
Yamaha have “hard wired” the Bass Drum or Kick Drum to send out midi note 33, the snare drum on note 31. These need to be re-mapped.
(See “Midi Transmit Note Number” on page 31 on the DTXplorer manual for the full list of the notes sent out by each pad).
What we need to do now is hit each pad in turn, and check that it fires the correct pad on Kong (which will light up when it is hit).
Flip Kong back around to face the front and try each drum.
We will try the Kick Drum here first. With any luck, it will light up the Kick drum in Kong.If so, great! Move on to the next drum.
If it fires a different sound:
Note which Kong pad number is fired (say, pad 3) . Note which one should be fired (say, pad 1). Then go to the “Drum Assignment” section in Kong, click on the magnifying glass to open up “Quick Edit Mode” and change the number for that pad in the little matrix that pops up from say, 3 to 1.
Alternatively, flip the unit back around and connect the CV out of the Kick drum RPG-8 to the correct Kong Pad. Just grab the cable from (say, pad 3) and re-connect it in the right pad number (pad 1) instead. The only hassle with this is that you can’t see which pad is which with Kong flipped around. Either make a note fo them, flip it around again to make sure or just remember which pad you or working with.
Hint: If you hover the mouse over a CV cable at the point where it is connected, it will tell you which RPG-8 it is connected to. Quite handy to check you have connected the right one.
Then work through the other Yamaha pads systematically. Closed Hi hat (foot pedal depressed for Closed Hi Hat), Open Hi Hat (Release the pedal), Stomp on the Hi Hat pedal for the foot operated click and then the rest of the pads in turn.
Then you should be good to go!
You can select new Kong patches within the combinator (by clicking on the “Browse Patch” button) but you may find different drums get fired up instead of the ones you want.
Not all Kong patches in Reason will be wired up in exactly the same way. Some may have the Kick drum as Pad 1, others may have it as say, pad 3 or pad 12.
If so, change the CV out connection to the right Kong Pad or just re-assign the Kong pad until you get all the right ones working. Either method will work. Each time you have to tweak one, save it with a different name in your own specified directory so you can use it again straight away without messing about next time. I save the revised Kong Patches separately, and also save the Combinator with a different name each time.
And that is it!
Here’s Kong’s pad configuration, with the recommended General Midi Mapping and the default “Gate In” connections from Ed’s patch shown in Red:
Please click on the picture to enlarge it if you can’t read it. Thanks.
All that remains is to set up the click for recording, press the record button and off you go! Enjoy!
And you can send Ed a note if you want to say thanks!
http://baumanproductions.com/
Do you like the sounds of the DTXPLORER?
Then check out our related article on FREE DTXPLORER Samples here:
http://www.howtoprogramdrums.com/dtx-exploded-sample-set-1-now-available-from-our-e-shop/